Sunday, September 27, 2009

New Toy, New Experiences

News that occur... Things one discovers... Like the limits of an almost $3000 camera. Take a peek at the two shots below...

This one above was taken at night, at ISO 6400. It's the Cole Hall Memorial, to commemorate the five NIU students shot in February 14, 2008. The one below, however, shows an artifact in the middle of the building; that's what happens when you push the limits of the sensor.

Cole Hall Memorial at Night (NIU)

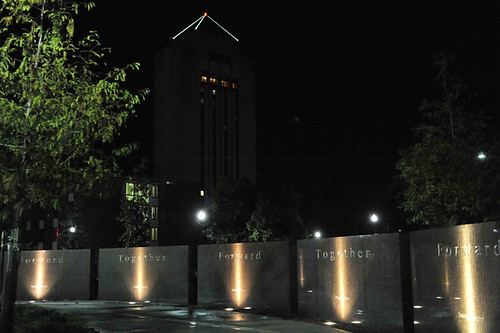
If you can, look at the building in the middle: there is a faint line there, slightly below the row of lit windows. What is it? "Normal" reaction to high contrasts at high ISO. Go figure. At least, the camera isn't in need of repair.

Now... the good stuff.

There's a new toy in town, a Nikon AF 70-210 f4-5.6. It's a non-D lens, and you can see it here, attached to my F100. As far a lenses is concerned, it's small, compact and practical. In fact, I think it's sharp enough to do the job of bringing stuff closer. However, it is noisy and the AF isn't as fast as if it were an f2.8. One might wonder what's the use of getting a lens like this... and, to be quite honest, the price was sooooo reasonable it would have been foolish to pass.

Now, the day I was out "testing" my new toy (and I do have some photos with it, but will post them later), I saw this stand-off in the yard: Mimi chased a squirrel and forced it to go up the tree. And Ben? He was just supervising her.

Now... the last and best: Rigoberta Menchú, Nobel Peace Price 1992, came to campus in Sept 23, 2009. My wife and I were both invited to a small reception and, since we couldn't find a baby sitter, my wife, wisely, resolved to take our son Edmund with. Here he is, meeting a Nobel Prize at his ripe 4 months of age.

Wasn't this some week? More on other things (like my AF ED 80-200 f2.8 zoom's return home) next time!

Saturday, September 12, 2009

Objects, details

Can be so much fun... The point, or my goal, is to isolate them, detach them from what they "belong" and turn them loose into the world of meanings. What do they mean or suggest? Hmmm...
Parts, sections, elements, fraction, function... the list goes on.

So many parts, sections and details. So many functions and uses, and yet, so human all of them, as they are vaguely connected to the part of our body we operate them with. Otherwise, how to explain the thin metallic cord of the lamp above, or the firm handle of the train seat. Heck, how do we explain the whole in the center of the table all the way above, without our getting used to this furniture?

BTW, two of these items are in DeKalb. You can guess which.

'til the next one!

Saturday, September 5, 2009

Backyard Studio

That's how some people call their backyard, because, if it's like mine, it offers a lot of possibilities for a decent shot with a macro lens.

Now, let's cut to the chase. These are macros, done with my Nikon D700, and while all of them are, say, reasonably decent, there's a postprocessing aspect that stumps me. However, let's begin by the beginning.

My macro lens is a Sigma AF 105 f2.8, purchased in the summer of 2005. It's seen a lot of work ever since. And, in fact, it's perpetually equipped with an 812 Tiffen filter. Will that explain the wonderful tonality of these photographs?

Just kidding...

That thing above is the lonely, single petal of a sunflower. The plants in our yard are about 8 feet tall... and that makes the flowers a bit difficult to photograph. The one above is a rare case of low bloom, and instead of doing the boring and overused top, frontal shot, I chose a less boring and overused petal contrasting with the sky. They have an abstract quality about them that makes them perfect for cards.

Summer wouldn't be complete without tomatoes. We have a happy crop here... and we better hurry to pick these ones (photographed with the above mentioned Sigma lens at f9) The odd thing I've learned with macro is that a smaller aperture rarely means a large DOF. Somehow, I figured out that long lenses do not really cast a sharp focus zone the same way wide angles do, and also that DOF operates in a much more generous way the further the subject is placed. Hence, despite the small aperture, there's some fuzziness about the second and third tomatoes.

But they do taste great...


Now, this lonely guy represents a problem. Take a peek at it, click on the image and you'll see an obscene amount of posterization on the right side of the shot, right where I want the bokeh to show its beauty.

How does this happen? I have no clue...

Usually, after downloading images, I work a little on levels and exposure, then use the Photoshop Elements function "Save for web." This one has the very unexpected effect of enlarging the dimensions of the file (if originally it is, say, 5 inches, after this function it will be 15 inches long). The way I change that, so as not to post outrageously large files on galleries, is that I open the file's dimensions, and reduce the largest one by at least two thirds (we're talking inches, here, not pixels). I thought I had it down pat... until today, when this little bugger baffled me.

What to do? I will appreciate suggestions. Thanks in advance!

Sunday, August 30, 2009

Darkness

Ain't Chicago great?

Who needs New York when this town is so visually rich? And, let me remind you, I'm not posting shots from the overused Milennium Park...


View from the bridge behind the Civic Opera.

The stairs inside the chuch that houses the Seminary Coop Bookstore, in Hyde Park.


I believe this is the intersection between Wabash and Monroe Streets, in the Chicago Loop.

Later, some other things I've done with this camera. BTW, its purchase was lagging on my credit card statement until recently, when I sent payment for the remaining balance. In other words, I just paid off both, my Nikon D700 and my AF-S 24-70 lens.

Time to get those warranty papers on hand... Just in case!

Saturday, August 8, 2009

Playing with DX


In both of these images I used my trustworthy (despite being much maligned) AF-S 24-120 VR lens. However, only, one of them has the DX area setting. Which one may be? The one with the colorfully made-up girl, or the window announcement about "patriotic items" going down in price? BTW, these were images from the Swedish Days in Geneva, where we went with our son (he has to learn to travel with his parents some day...).

So, which one is it?

Try again...

Yep...

The reason to do this was to crop in camera at the same time that I maximized the reach of the lens. The nice portrait didn't take me long to shoot, and it benefitted from the framelines that help compose through the viewfinder. Yes, one could claim that I "lose" information by reducing the document to 5 MP instead of using the whole shebang of this 12 MP sensor... but my concern is to get the image, reach where I want, not to produce a file of a certain dimension.

Do you do this often? I found myself doing it for this shot in California, only that instead of my AF-S 24-120 I had my AF-S 24-70.

Not bad for a beginner... At a given moment, having the DX option contributes to extend the reach, get the shot and maximize a telephoto. This image, cropped to look like something shot with a 115 or 120mm lens, simply delivers what I wanted to show: the thrill of going down in a weird, crazy machine, in a sunny, gorgeous and intensely blue day.

Saturday, June 6, 2009

News

We became parents on May 8, 2009.  That also means I have a new model!

Edmund Julian, two days old.


Edmund, a day older than above.

Our cat, Ben, discovering his new housemate. 

Of course, all the shots above were taken with the D700.  The first two with WB at 2500°K, the third in Auto.  I cannot recall the ISO, but in all of them it wasn't very high (just about 1600). 

He's keeping us busy... especially at nights.  Otherwise, I've continued with my hobbies and soon will post some macrophotography shots, taken around the garden with my Sigma AF 105mm lens.  

Right now, my Nikon AF 80-200 is still in the shop (since early February!).  It was returned shortly before my son's birthday, but the problem (sticky blades) continued, so I sent it back... and haven't heard from the shop ever since.  I'll have to call them soon and find out.

Meanwhile, I've been considering a new lens to replace the Nikon (which is the first version of the 80-200, a push-pull).  The Nikon AF-S VR 70-200 is outrageously expensive, and even more since all the prices went up, so I've been thinking about the Sigma or Tamron f2.8 alternates. 

Ooops... it seems there's a diaper change coming. 

Tuesday, April 14, 2009

Spring about to come!

Sure... and it looks like a bad joke, innit?

At least, one could believe something was afoot early in March...


Until we got a white surprise in the end... 


But before I continue, let me add that all of these images were made with my trusty D700.  I've been working (rather playing) with it at all times, and "exposing" it to some conditions that, admittedly, are not harsh, but still demanding... like the last photograph with the hydrant (the only one taken with my Tamron AF 200-400 zoom).  Temps were pretty low... but I've walked down colder sidewalks with this camera.

The tree up there is in my backyard.  That was during one of the first nice, sunny days this year.

The cat here belongs to a friend who lives in Madison WI.  It's a nice Maine Coon called Jiggy (she's a feisty player, and you can tell from her face).  

Last shot: March 28: snow around us (about seven inches), dressing up the boring fire hydrant across the street. 

Lately, I've taken to use relatively low ISO ratings.  It simply happens that I am far more familiar with the images I create at ISO 200 or 400 than anything done at ISO 1600 or higher.  Besides, with such luminosity, why should anyone bother with fast sensor speed?  

Or does someone do that?

I am awaiting for my Nikon AF ED 80-200 to return from the shop where I left it (in Chicago's Central Camera).  It turned out to be sick: sticky blades.  The repair will cost me a pretty penny... but I'm trusting on getting a decent lens in the end.  In the meanwhile, before getting my Nikon back, I'll keep playing with my current arsenal.

Comments welcome!

Sunday, March 8, 2009

Browsing in the Menus with the command dials

First off, a word about the photos below: one of these two is a shot of Santiago Calatrava's wing of the Milwaukee Art Museum. The other, is the side wall of the Chicago Lyric Opera theater. I'm sure you can guess which is which...

Now, let's go down to business.  I offered a little tip last time: how to check your menus without pushing the round wheel, officially known as multi-selector, in the camera back.  In fact, you should be able to navigate through it with your command and subcommand dials.  

This is how you do it.  Turn on your D700 first.

Now that it's on, push the Menu button.   Go to the Custom Setting Menu, then to the Controls section, which is F.  Now, look for F9:  Customize command dials.  Click OK.  In the menu you will find "Menus and Playback" as one of the choices.  Click on it to turn it on.  Return to the Custom Setting Menu

Now that you're in the main menu... Play with it!  Let's assume you are in the Playback Menu and that your first choice, which is DELETE, is already highlighed and on top of the menu.

  • Now, turn your main command dial (the one in the back of the camera, right in front of you) to the right, and you will find it goes downward, highlighting selections as it goes down.  Turn it leftwise and it goes up. 
  • But you didn't want to do anything with Playback!  You turned on the menus to check, say, Vignette Control.  What do you do?
  • You turn the Sub-command dial (the one in the front of the camera, right above the grip) towards the left.  Now, the cursor-selector is on the Tabs (in which the options are Playback, Shooting, Custom Setting, Setup, Retouch and MyMenu).  
  • Turn your main command to the right just one step and you'll find yourself in the Shooting Menu.
  • Turn your subcommand dial to the right.  This will take you from the Tabs to the Shooting Menu
  • Active D-Lighting should be highlighted.  If not, that's because it wasn't the last choice you used when you turned to this menu the last time.  
  • Turn your main command dial to the right one step... and voilà!: you are in Vignette Control.
  • Things get better... Turn your subcommand dial to the right again...
  • Here you see your choices: High, Normal, Low and Off.  Pick the one you prefer by rotating the main command to the right or left, and then, only then, push the OK button.

You're done... and you haven't used the multi-selector at all!   Ain't that cool?

I'm sure this option must be in the manual, but I didn't bother finding it or even looking for it.  I simply stumbled upon this by accidentally turning one dial while I was looking at the menus.   In essence, you use the main command to navigate them, and the subcommand dial to switch around.  The logic is pretty intuitive, because you turn the subcommand to the left when you want to go to the Tab, or to the right, when you want to go into a particular menu. 

For another cool choice with the Nikon D700 (and I believe you can use it in the D300 as well), go to D-Town TV and watch the first episode of Scott Kelby's and Matt Kloskowski's TV Nikon camera tips show.  Episode No. 1 will show you how to review your photographs in Playback without using the multi-selector, and using only the main command in your camera.  The best thing is that while you can turn from shot to shot with the main command, you can review the technical information with the subcommand dial.  

Goodbye to using that multi-selector again! 


One important last word:  check out Scott and Matt's weekly episodes and make sure to add their site to your bookmarks.  You can always find them in the list of relevant Nikon links to the left of this text.  They are really good; in fact, their first episode really convinced me to buy the Capture NX 2 software, even though I had pretty much decided against it.  In the meanwhile, have loads of fun with your toys!


Saturday, March 7, 2009

I broke down...


I did... and bought a nice copy of Capture NX 2. 

The deal is this: apparently, there simply is no better software than Capture to edit RAW files, or to edit images, period.  I wasn't too crazy about it at first, but then, I read a couple of tutorials and its apparent simplicity ended up convincing me of the purchase. 

Now, I did not pay the MSRP.  The NY store Cameta Camera was selling it for about $127.  Compared to the price at which one can find it at B&H or Adorama, it's a steal. 

I'll continue with my experiences later.  For now, I have to sink my nose in the 250+ page manual that came with the CD in a relatively large box that promptly went into the recycling bin.  

Also, a couple of neat tricks for playback coming soon!

Friday, March 6, 2009

Pixel Peeping Syndrome


First things first...

Below, a nice sample of what this camera can do.  It's a piece of pottery from the Milwaukee Art Museum, shot with the lens wide open, at probably ISO 5000, Auto WB, and checked out some time later in the camera monitor.  It looked nice...  


Then, I downloaded it to my Mac... and I didn't quite like what I saw... 

When I bought this camera, I already had looked at all the possible images taken with it, found in Nikon ads (their website had some), Flicker and Nikonians.  One thing that really sold me was the almost absolute perfection.  As a friend said once about his conversion to digital, there was no grain. 

But then, how about them pixels?


Can you see the little devils?  I thought I had... in the RAW file!  This is too much... I want purity, clarity, sincerity, absolutely no granulosity...

Then, it dawned on me: I've become a pixel peeper. 


Must admit it: before opening the daffodil above (which, by the way, was done with my SB-600 at f8, in a futile attempt at reproducing the darkening of the background that relatively fast shutterspeeds can do with flash), I looked at it really close.  There they were again.  Heck!  There they are, under the naked eye, right above... and, alas, below too. 


Same little daffodil, a bit posterized because of my clumsiness at using Photoshop.  

BTW, the shot above was done with a close aperture, in P, with an SB-600.  My attempts at getting overexposed foregrounds and dark backgrounds are failing miserably...  But I'm even more frustrated because of this stupid habit of looking for flaws and pixelation.  

Is there a cure?

I guess I'll have to learn to live with it.  

In any case, for whatever is worth, I placed an order for Nikon Capture NX2 earlier this week.  It may be coming soon.  And my Nikon AF-ED 80-200 f2.8 lens is in the shop right now. 

However, life still looks good.

More about things later!

Friday, February 27, 2009

The Thing about Picture Control

Welcome to the mystery of picture control!!

Here's a photograph of Mimi, with Vivid Picture Mode.   It appeared striking in the monitor (very intense reds and yellows), so I was happy, despite the wild contrast between her fur and the seat of this very chair I'm on right now.  


Now, the same cat, under the same light and on the same spot... but with Neutral Picture Control.  The fur looked terribly flat, the colors were muted, the entire palette from the Vivid setting was gone.  


So, I switched to Standard.  Here I saw a type of compromise between Vivid and Neutral; an amicable middle ground in terms of color saturation and contrast.  

Now... that was before downloading the files into my computer and then resizing them (hopefully better this time) for internet viewing.  

Vivid... it doesn't look too vivid, does it?

Neutral doesn't sound half as bad as my description of the jpeg in the D700 monitor.  I'm feeling like with egg on my face...

Standard, however, still looks like an acceptable compromise here.

Lesson learned?

Besides never to trust your monitor... the fact that these shots look pretty much the same in my monitor leads me to wonder what the effect of this setting may be on prints.  

In the meanwhile, this is what I did with the files: they were all RAW (NEFs) downloaded to the computer via card reader and Nikon Transfer.  Then, opened with PSE 6 for Mac, and turned into JPEGs.  The consequent, intermediate JPEGs were resized in size and resolution (say, from whatever they were to 1550 on the larger side, and the resolution down to 150 dpi).  After this, I did a "Save for Web" function, and set the JPEG parameters in High.  Oh, and I also reopened the "cleansed" files and reduced the print size from 13 inches to 8 (on the large side).  In short, all files now should be clearly viewable in almost any screen size, not just in my 20-inch monster.   At no time whatsoever did I do any alteration in color or exposure here.  In short, except for the file conversion and re-compression, these are the photographs that came out of the camera. 

I'm interested in your reactions, and will appreciate comments.  Of course, soon enough I should have something to say about the prints of these images...

Friday, February 13, 2009

Couple of Issues for Shutterbugs


Here we go again... 

Here is a photograph of the cats, with the SB-600 flash aiming at them.  It was the best way to solve a problem I was having, as it can be seen below...


The cat in the foreground appears fairly well lit, but what about the one in the background?  Ben, when photographed with the SB-600 bouncing light off the ceiling, appears nicely exposed.  Mimí, behind the TV stand, was not.  I had to do something I usually don't, which is to aim the flash directly at them.  That was the best way to get the results I wanted.  Now...  a common exposure problem: exposure for highlights.  Which of the landscapes below looks better?  The one right below... 


Or this one?


The difference between them (in case it's not obvious) is a couple of notches of underexposure.  In fact, the landscape below was shot as per camera meter settings on A-mode.  It did give me a good color for the snow, as it appears right before sunset in my corner of the world.  So, I dialed two thirds of underexposure (thanks to the Quick Exposure Compensation feature; check b4 in the Custom Setting Menu) and shot again (with a slight change of position, so as to avoid the distortion effect of the post on the left), and...
voilà!  Got the colors I wanted. 

Why this move?  Why tinker with the exposure?

The camera is a tool, and users tend to let it dictate their end result.  In this particular situation even though I wanted (and metered on) the sunset colors, the camera matrix meter dialed up the highlights.  It is a tendency of all digital sensors, and from what I understand, it's in their algorithm.  However, a photographer has something better: brains.  That's why, after noticing the slightly singed effect on colors, I took a second shot of the first photograph but with a slight underexposure.  This one allowed me to register the colors I wanted.

As for the snow?  One still can tell it's snow, right?  

Later on, some flash effects with this camera and the SB-600. 

Saturday, February 7, 2009

Still, the need to get WB figured out


Still, grappling with the
WB setting in the camera.

Oodles of shots later, I think I have an idea about what to do: set the thing manually.

Examples?  Here's the same boring view from my kitchen window... in 2500°K.  Pretty cool...


Now, the Auto WB version (which is probably down below, in the previous entry).  Colors are fairly realistic, if we consider that the light is reflected by the snow, and the sun is pretty dull.


However, here's the practical use of this experiment.  Since the WB at 2500°K is so cool... this is the way it works when used indoors, under incandescent lighting.  To me, both in the camera monitor and later in the computer, the color rendition is highly satisfactory.  Gone are the whims of Auto WB!


BTW, here's the same room... using Auto WB.  A bit compensated, but the yellow cast is still there. 

I think I just stumbled into the secret of incandescent light shooting happiness...  

The next challenge: flash use. 

Before closing, I must thank those who take the time to post comments here.  In one case, I learned the solution to working with NEF (RAW) files without Nikon Capture, and it is simple: I can open the RAW file via the .dng plugin in Photoshop Elements, then save it as an 8-bit file, not a 16-bit.  Once an 8-bit, it's easier to work in PSE to save it as jpeg, and then compress it enough for web posting uses.  

And, when it comes to compressing... I must thank Oscar Reyna for his suggestion (see comments below).  I will see how to implement them and improve the quality of these jpegs.  It's the least I can do now that I have a camera, a good computer and the software to match them.  

If I only had the brains...  But that's just beyond warranty.  

Next time: accessory flash!

Tuesday, January 27, 2009

The case for White Balance


Things to learn about white balance...

A few days ago, distractedly, I looked out the window and took this photograph. 


Shortly afterwards, when I looked into the screen, I nearly jumped when I saw the photo above.  Then, I realized that the last time I picked up the camera I had set the Tungsten (white balance, that is, the little light bulb) white balance.  That got me thinking... and wondering what would it be if I used the neon white balance setting.


Here it is, only a bit cool, not by much, the Neon white balance seems unnatural.  Does it really need to be this cooling...  Then, I considered another choice, so I dialed it in.


It was the Cloudy setting.  Even though the day was actually cloudy, it doesn't seem that this setting actually helps with the color.  Or am I being excessively demanding here?  Given the circumstances, I switched White Balance to another setting: Sunlight.


Here's it!  The same image, or at least its idea, in all the glory of Sunlight (that is, the nice sun sign).

Now, I do not intend to show any camera or software flaws, but rather present the things this camera can do if we, users, stop putting our brain on hold and take the reins.  

A result of my own experiment is that I have found a satisfactory setting, even cooler than the Tungsten one: I call it the 2500 degrees view.  That's it: for serious tungsten situations, just set the light temperature at its lowest parameter (2500°) and there you go with a perfectly adequate WB for tungsten lights.

More on this later.  Thanks!

Friday, January 23, 2009

"View" to the Rescue

A man making a living in the Monterey Fisherman's Wharf, doint street portraits (D700, AF-S 24-70 f2.8). 

Animal prints in my yard.  The temperature out there was pretty low (same gear)... 

Frozen doorknob inside of a garage (same gear)


Against my better judgment, I will purchase Nikon Capture, after all, just not right now.

Why?  Nikon View came to the rescue!

While I am able to open RAW files with Photoshop Elements 6 (the latest one for Macs), I cannot save them as regular JPGs, but only as a format called JPEG2000, which has a strange extension: .jpf.  I don't know how valid and useful it is for web purposes.  Of course, I can also save files as TIFFs, but frankly, I don't know what advantage these ones have over JPGs.

In any event, at some point, recently, I opened a RAW file with Nikon View, and was able to save it as JPEG.

The truth is that since View seems to be one more image editing program, along with PS and Nikon Capture, I wonder about the real need to use Capture and add it to my computer.  However, once I buy it, I may be able to remove it or keep it...

And, of course, I'll have to add memory to my machine. 

Now, I'm taking a look at a serious book about PSE in the Mac, and hope it'll show me how to save better jpegs.  

BTW, more about the D700 next time.  I have some mildly interesting experiments with WB, and I intend to apply the results later.  Who knows?  I may have it all ready very soon.

Sunday, January 18, 2009

Should I "Capture" or not?

I have a question, or a dilemma, rather. Should I buy the Nikon Capture Software?

Skating girl on ice rink near the Ferry Building, in San Francisco, CA, late December 2008.


Smiling girls in Union Square, San Francisco CA


Sears, near Union Square, where they come up with delicious breakfast food. 

All the shots above were taken with my D700 and my 24-70 f2.8, at very high ISO.  If Nikon ever did something good with the D700, it was this glorious performance at ISOs above 3200. 

But I won't keep gushing about the camera or the lens (which has its drawbacks, but I'll elaborate on them later).  I need to hear what others have done.  Right now, I'm thinking seriously about NOT buying the Nikon software, Capture NX 2, as I have updated my Photoshop Elements version to handle RAWs from the D700.  With a plugin recently added, PSE can actually open Nikon's RAW files, and I can resave them as TIFFs that later get turned into JPEGs (like the photographs above).  There is one feature of Capture that I like: the famous D-Lighting.  It's a lighting "smart" fix that comes in handy to have for the cases in which I haven't applied it on the image while editing in the camera.  Otherwise, unless D-Lighting work as the Auto Levels in PSE, I feel pretty much like I'm ready to face the RAWs.   In fact, I'm more familiar with PSE (and find it a little more intuitive) than with Capture NX2.  

So far, the D-Lighting is the only pro about Capture NX 2.  As for its drawbacks, I must say that it does slow down your computer, that the menus and functions are, at least in my little experience, pretty similar to those in PSE, but without the intuitive quality.  Since I can open RAW files by clicking on them (in both of my Macs, one with Tiger and the other with Leopard), I frankly feel like the one and only virtue of Capture got cancelled. 

What do you think?